
The Remington R51 is here (actually I have had it for over a week). This is an new gun utilizing an action design not seen in handguns for nearly 100 years. The R51 uses an impeded or delayed lock blowback action designed by John D. Pedersen, that was last seen in a handgun in the Remington 51 produced between 1918–1927. The Model 51 was chambered in .32ACP and .380ACP. A Model 53 in .45ACP was submitted for Army trials and from all reports, actually performed better than the 1911, but Remington could not produce the numbers required. The R51 is chambered in 9mm Luger (or Parabellum) and is rated for +P ammo. It is a single stack with 8 round (7+1) capacity. The gun is targeted for the concealded carry, personal defense market.
The release of the gun prompted the usual rush of reviewers trying to see who could demonstrate the most problems in YouTube videos. It became the gun everybody loved to hate. I was not one of them for two reason: I could not find an R51 for several weeks and when I did, I had very few problems.
As my search dragged on, I watched the videos and read the online forum reports and had second thoughts. Bulging primers, bulged cases, metal shavings in the action, rifling shooting out of the barrel, stuck safety, jammed slides, failure to fire, failure to feed, failure to eject, and total lockups, along with loose sights and assorted loose pins and screws. Some reviewers giddily proclaimed its demise, others just recommended waiting for the second or third production run when the problems had been resolved.
But I have been a software beta tester and am not afraid to live of the bleeding edge of technology. Someone has to do it or there won't be enough sales to warrant a 2nd production run. So when I found one at a local Academy store, I grabbed it.
Speaking of software, there is no warranty card in the box, warranty registration is on line. Only problem is, the R51 is not listed in any of the drop down lists. The online form will accept all of the informatuon requested, and clicking "SUBMIT" produced no error so I think my warranty is registered. Apparently Remington's website gurus are off working on healthcare.gov.
Dimensions
- Weight w/empty mag; 22.3 OZ.
Weight w/o mag: 20.6 oz.
Width: 25.4mm / 1.00"
Length (Diagonal dimension-base of grip to muzzle): 202mm / 7.95"
Length (straigt line Muzzle to base of grip line): 175mm / 6.89
Length (Muzzle to end of slide): 172mm / 6.77"
Height (base of grip to top of sight): 116mm / 4.57"
Mag well width: 15.4mm / 0.606"
Mag well length: 36.9mm / 1.45"
Magazine width: 15.1mm / 0.59
Magazine length: 33.2 / 1.31"
Grip Height BackStrap: 78.9 / 3.10"
Grip Height FrontStrap: 63.5mm / 2.50"
Grip Length: 52mm / 2.05"
Grip Width: 25mm / 0.98"
Pull: 75.2mm / 2.96"
Front of Trigger Guard to Muzzle: 45mm / 1.77"
Inside Trigger Guard Height: 23.7mm / 0.93"
Inside Trigger Guard trigger to front: 25.3mm / 0.996"
Barrel (breech face to muzzle 84.6mm / 3.33"
Barrel (case base to muzzle 87.7mm / 3.45"
Chamber depth: 16.18mm / 0.637" +/- 0.0254mm / 0.001"
Sight radius 116.75mm / 4.6"
Sight height (above bore center): 17.78mm / 0.7"
First impressions:

The large green box lid cam off to reveal a manual, a lock, 2 magazines and the gun, buried in 2.5" of foam. The two stainless steel magazines have plastic floor plates and followers, and really stiff springs. They hold 7 rounds each and the last round is really hard to get in (more on that later).


The gun is black, matte black. The slide is stainless steel finished in black nitride. The frame is black anodized aluminum. Feels really good in the hand and points naturally. With grip panels with a little palm swell, (or a double stack frame)it would fit my hand as well if not better than my Browning HiPower and for me, that is saying a lot.
Sights are tight. At least, they do not move under finger pressure. Very visible and easy to pick up.
Slide is tight and a bit rough. Yes, it is hard to rack. Is a lot easier if the grip safety is fully depressed and even easier if the trigger is held back while racking. Then release the trigger so it will reset. Slde doesn't hang or remain open or even seem to want to. Return to battery is strong. After stripping, cleaning and regreasing, including the rails which did not appear to be greased initially, slide is smoother.
Trigger has some side to side play but it doesn't seem to have any detrimental effect. Pull is crisp with about 1/8" take up and a clean break around 5-5.5#. Escept fo the side wobble, it feels almost exactly like my BHP (w/o mag safety). I don't know why the side wobble is there. It feels like the pin hole is oversize for the pin. Maybe a bushing would help.
Grip safey is not stiff. Disengages with noticable pressure. There is an audible click but it is not loud. It offers enough resistance to prevent inadvertent depression but not enough to interfere with functioning. Anyone using a grip with push-pull tension should have no problem with the safety. Using a thumbs forward grip with side to side tension may result in erratic depression of the grip safety. It may take concious effort to remember to depress it.
The overall feel is a bit rough, but is about what I would expect from newly machined parts with a matte finish on the bearing surfaces. Should smooth out with use.
Field Strip
To field strip, you have to pull the slide back to align a take-down notch with the slide stop pin and hold the slide, which is under tension from the recoil spring, in this position while you remove the slide stop pin. The end of the slide stop pin is recessed in the frame and tool of some kind is required to get the pin slide stop out—I used the corner of the mag floor plate.Once the pin is out, you grasp the barrel by the fine knurled ridges machined into it and pull the barrel and slide assembly forward and off of the frame. While still holding he barrel, you can remove the breech block. Once the breech block is out, release the barrel.
The recoil bushing is a round sleeve in tront of the chamber Push the recoil bushing forward until it aligns with the notches on either side of the slide, Then tile the barrel and bushing upward and remove the barrel. Remove the bushing ans spring and field strip is complete.
A Look inside
The breech block does not have any rough spots on any bearing surface. In fact, the camming surfaces appear to have been polished.Some reviewers have reported gouges in the frame where it blocks the breech block, but there are none present on mine either out of the box or after hundreds of hand cycles, but I haven't been to the range yet. The "gouge" points are the surfaces that block the breech block. The finish is worn off at these points from hand cycling the action, but there does not appear to be any deformation of the metal.
 | |
| Forward Frame Rails |
 |
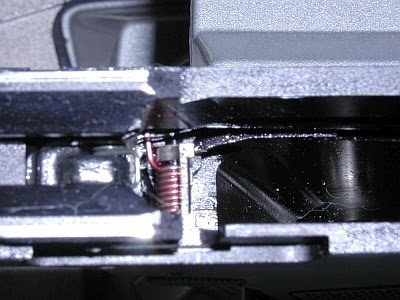
| Locking Block & Disconnector |
 |
| Locking Block Detail |
There are no machined grooves in the barrel channel of the slide as recorded in some videos. The bore is bright and the rifling is sharp. The chamber looks dull in comparison (more on this later). There are what look like spiral boring marks inside the spring shroud of the slide but they are smooth to the touch.
The barrel is fixed in place. It slides into grooves on the inside of the frame rails and is held in place by the slide stop. The recoil spring fits into a bushing that slides over the barrel and is stopped by the chamber shoulder so the barrel serves as a recoil spring guide. This design places the bore axis 25% lower than in others guns of the same class.
Remington says that any disassembly/stripping beyond field stripping should be don by factory techs. Looking into the frame it is easy to see why.
For one thing, the internals are fairly inaccessible, and the sear pin, trigger pivot pin, hammer pin and upper safety pin (my names) all hold multiple parts in place, which includes springs that are saddled around other parts. Slave pins will absolutely be required for the sear and trigger and probably the hammer and safety which can't be easily seen with the grip safety in place. I wish I could find a schematic.
The trigger assembly is attached to a stirrup (like a 1911 or the 51) which may be further attached to the sear or safety assemblies (it extends into an obscured space and can't bee seen) I would like to try to put a bushing in the trigger pivot hole to take out as much of the wobble as possible, but I'm not sure I can get the trigger assembly out. I am sure I would need a slave pin (or a frame width bushing acting as a slave pin) to put it back in, and if I can't get it out, I can't install the slave pin to get it back in. Fortunately, the wobble is the only thing about the trigger that is objectionable enough to require attention.
Magazines
The magazines are stainless steel.The floor plate is two piece plastic. A hole in the external plate allows you to depress the plate inside and remove the external plate by sliding it forward. This allows the internal base plate, spring and follower to be removed (and if you don't hold it in place, the plate will remove itself and fly across the room). The follower is plastic as well.The stainless sheet metal is welded at the back and the seam ground flat. There have been reports of this seam splitting where it was ground to thin, so need to look fro that. The index hole in the side line up nicely with the rounds inside making capacity easy to check. There is a cut on each side for the magazine release.
There are is a groove pressed into each side running top to bottom which keeps the bullet nose centered in the mag. A lip at the top front forces each round to the back of the magazine as it feeds. There are reports that is lip can cause really wide hollow points to hang up and fail to feed. All this is necessary because the mag well is over sized and the magazines fill it. There is plenty of room in the mag well to accommodate .40 S&W, is an obvious possibility, but .45ACP could be possible with the right bullets. I doubt bottleneck cartridges such as .357 Sig would like the delayed locking of the breech. It would almost certainly blow out the shoulder and severely reduce case life for reloaders.
As noted, the spring is really stiff and the last round loads with difficulty. I'm concerned that the spring may be pushed beyond its tolerance range which will weaken the spring if left in this condition. This will bear watching for problems feeding the last round or locking back the slide. It may turn out that the last round needs to be chambered immediately to save the spring, making the working capacity 6+1. Until more mags are available, I'm only going to keep 6 in the two I have.
Grips
The grips are flat checkered plastic panels set into the lower 2/3s of the grip frame. They are held by 2 screws each. The screws are hexhead screws and at least one looks like a TORX head with the teeth worn down. Others have reported needing TORX drivers to tighten the screws but a hex wrench worked fine for me. The screws may work loose, so a little loc-tite may be in order. This is important because the grip panels capture a pin that holds the top of the grip safety in place. This is the only loose pin on the gun and can easily fall out when either grip panel is removed.After market grips should be easy to make, but thicker grips requiring longer screws will be a problem. The screws have a ultra fine thread pitch yet to be identified by anyone or disclosed by Remington. I'm guessing they determined fine threads work better in the aluminum frame.
Next pust: A look at the Pedersen action.
1 comment:
It is nice to know about R-51. It really have good feature and i will love to do target shooting with it.
Post a Comment